Many organizations use both Microsoft Edge and Google Chrome. Edge benefits from built-in SmartScreen and tight integration with Microsoft Defender for Endpoint; Chrome has its own safeguards but does not natively feed into the same security stack. The Microsoft Defender Browser Protection extension for Chrome closes that gap: it brings SmartScreen-style protection into Chrome and ties it directly to Defender for Endpoint, so phishing and malicious-site blocks are consistent and visible in your security portal. This post walks through deploying the extension automatically on Windows devices using Microsoft Intune and the Settings catalog, so every Chrome user gets the same protection without manual installs. Note: Microsoft currently documents the extension as supported in the United States; check the latest documentation for other regions.
What the Extension Does
The Microsoft Defender Browser Protection extension runs inside Chrome and:
- Blocks known phishing and malicious sites before the page loads.
- Uses the same SmartScreen-style technology as Edge, so behavior is familiar.
- Sends block events and telemetry to Microsoft Defender for Endpoint, so you see Chrome activity alongside the rest of your endpoints.
Chrome’s built-in Safe Browsing remains in place; the extension adds a second layer that is integrated with your Microsoft security tools and reporting.
Deploying the Extension with Intune
Deployment uses the same mechanism as any other force-installed Chrome extension: the Settings catalog in Intune, which exposes the Chrome ADMX settings (backed by Chrome.admx). The relevant policy is Configure the list of force-installed apps and extensions. When you add an extension ID and its update URL, Chrome installs the extension automatically and users cannot remove it.
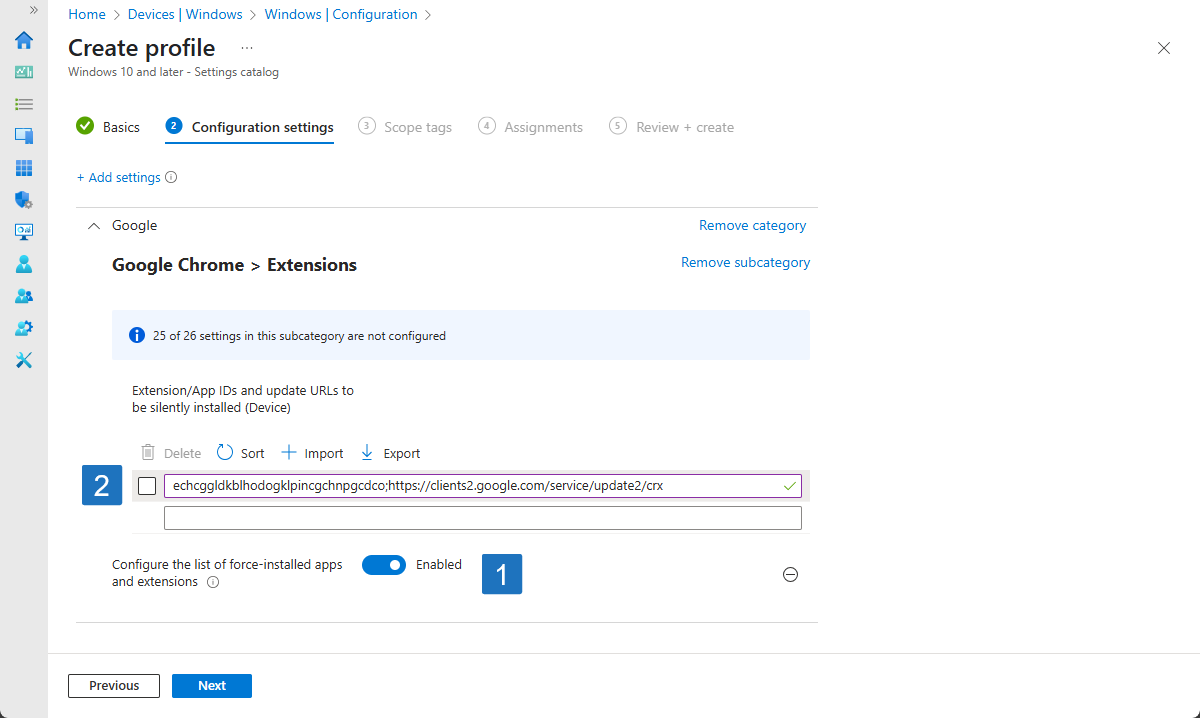
In the Microsoft Intune admin center, go to Devices → Windows → Configuration profiles and choose Create → New policy. Select Windows 10 and later and Settings catalog, then Create. On the Basics page, give the profile a name (e.g. “Chrome – Microsoft Defender Browser Protection”) and optionally a description. On Configuration settings, click Add settings, go to Google → Google Chrome → Extensions, and add Configure the list of force-installed apps and extensions. Set the policy to Enabled. In the field for extension IDs and update URLs (often labeled Extension/App IDs and update URLs to be silently installed (Device)), enter:
bkbeeeffjjeopflfhgeknacdieedcoml;https://clients2.google.com/service/update2/crx
That is the Microsoft Defender Browser Protection extension ID followed by the Chrome Web Store update URL. You can add more extensions in the same policy by separating each ExtensionID;UpdateURL pair appropriately (e.g. with a new line or as the UI allows). Save the Basics and Configuration steps, configure scope tags and assignments, then create the profile. The same profile can also hold other Chrome policies if you prefer a single “Chrome configuration” profile.
The screenshot below shows the Intune Settings catalog with the force-installed apps and extensions policy configured for the Microsoft Defender Browser Protection extension.
Extension ID and Update URL Reference
For the Microsoft Defender Browser Protection extension:
- Extension ID:
bkbeeeffjjeopflfhgeknacdieedcoml - Update URL:
https://clients2.google.com/service/update2/crx - Format in policy:
bkbeeeffjjeopflfhgeknacdieedcoml;https://clients2.google.com/service/update2/crx
Chrome uses the update URL to install and update the extension from the Chrome Web Store. Typo-free IDs and URLs are required for the extension to install correctly.
What Users See
After the policy applies and Chrome has restarted (or the user has reopened Chrome), the extension appears in Chrome and cannot be uninstalled by the user. It runs in the background. When a user tries to open a site that Microsoft classifies as phishing or malicious, they see a warning page (similar to Edge’s SmartScreen block page) explaining that the site was blocked for security reasons. Depending on policy, they may or may not have an option to continue; the important point is that the block is enforced by the extension and the event is reported to Defender for Endpoint.
Defender for Endpoint and Reporting
Because the extension is part of the Defender for Endpoint story, blocked navigations and related signals show up in your usual Defender for Endpoint views and reports. You get a single place to see threats blocked in both Edge and Chrome, and you can correlate browser activity with other endpoint data. Ensure devices are onboarded to Defender for Endpoint and that the extension policy is assigned to the right user or device groups so coverage is consistent.
Practical Tips
- Roll out to a pilot group first, then expand once you confirm installation and blocking behavior.
- Tell users that the extension is required for security and that they may see block pages when visiting dangerous sites.
- Combine this with your existing Chrome configuration profile so all Chrome policies live in one place.
- Check Microsoft documentation for the current supported regions; the extension has been documented as United States–oriented.
Troubleshooting
If the extension does not appear: confirm the configuration profile is assigned to the user or device and that the device has synced. Have the user fully close and reopen Chrome (or restart the device). If it still does not install, double-check the extension ID and update URL for typos and correct formatting (ID;URL). If blocks are not appearing in Defender for Endpoint, verify Defender for Endpoint onboarding and that the device has the extension installed and is in a supported region.
Summary
To get started with the Microsoft Defender Browser Protection extension for Google Chrome: create a Settings catalog profile in Intune (Windows 10 and later) under Devices → Windows → Configuration profiles. Add the Chrome setting Configure the list of force-installed apps and extensions, set it to Enabled, and in the extension list enter bkbeeeffjjeopflfhgeknacdieedcoml;https://clients2.google.com/service/update2/crx. Assign the profile to the desired user or device groups. Chrome will install the extension automatically; users get SmartScreen-like protection against phishing and malicious sites, and events flow into Microsoft Defender for Endpoint for unified visibility and management.