Windows Hello for Business lets users sign in with a PIN or biometrics (fingerprint, facial recognition) instead of. Or in addition to. A password. In some environments it is disabled by policy or Group Policy, so users cannot set up PIN or biometrics even when you want to allow it. You can re-enable it by setting the right registry values and deploying a PowerShell script in Microsoft Intune. This guide shows the script and how to add it as an Intune PowerShell script and assign it to your devices.
What Windows Hello for Business Is
Windows Hello for Business (formerly Microsoft Passport) uses a device-bound credential. PIN or biometric. So users can sign in without typing a password. It supports a passwordless or reduced-password experience and is often used with Azure AD or hybrid join. If your organization has disabled it (e.g. for shared or kiosk scenarios) but you now want to allow PIN and biometric sign-in on certain devices, you can enable it via registry policy and deploy that with Intune.
PowerShell Script to Enable Windows Hello
Enabling Windows Hello for Business is controlled by registry under HKLM\SOFTWARE\Policies\Microsoft\Windows\System and HKLM\SOFTWARE\Policies\Microsoft\PassportForWork. You need to allow domain PIN logon and enable PassportForWork; set DisableBiometrics to 0 if you want fingerprint or facial recognition. Example script:
# Enable Windows Hello for Business (PIN and biometrics)
Set-ItemProperty -Path "HKLM:\SOFTWARE\Policies\Microsoft\Windows\System" -Name "AllowDomainPINLogon" -Value 1 -Type DWord -Force

if (-not (Test-Path "HKLM:\SOFTWARE\Policies\Microsoft\PassportForWork")) {
    New-Item -Path "HKLM:\SOFTWARE\Policies\Microsoft\PassportForWork" -Force
}
Set-ItemProperty -Path "HKLM:\SOFTWARE\Policies\Microsoft\PassportForWork" -Name "Enabled" -Value 1 -Type DWord -Force
Set-ItemProperty -Path "HKLM:\SOFTWARE\Policies\Microsoft\PassportForWork" -Name "DisableBiometrics" -Value 0 -Type DWord -Force
Save this as a .ps1 file (e.g. Enable-WindowsHello.ps1). The script must run in the system context (as with Intune PowerShell scripts) so it can write to HKLM.
What Each Setting Does
- AllowDomainPINLogon (Windows\System) . Set to
1to allow PIN sign-in for domain (and Azure AD) accounts. When0, PIN logon is disabled. - Enabled (PassportForWork) . Set to
1to enable Windows Hello for Business on the device. When0, Windows Hello is disabled. - DisableBiometrics (PassportForWork) . Set to
0to allow biometric sign-in (fingerprint, face). Set to1if you want PIN only and no biometrics.
Deploy the Script with Intune
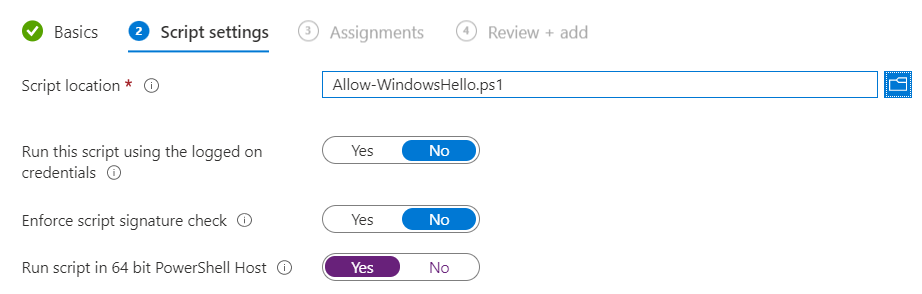
In the Microsoft Intune admin center, go to Devices → Windows → PowerShell scripts. Click Add. On Basics, give the script a name (e.g. “Enable Windows Hello for Business”) and optionally a description. On Script settings, upload your .ps1 file. Leave Run this script using the logged on credentials off so it runs in the system context (required for HKLM). Click Next, add Assignments (user or device groups that should get the script), then Review + add and Add.
After the script runs on targeted devices, users can set up a PIN and (if DisableBiometrics is 0) biometrics in Settings → Accounts → Sign-in options. For more on Windows Hello for Business and Intune, see Windows Hello for Business and Use PowerShell scripts in Intune on Microsoft Learn.
Summary
To enable Windows Hello with Microsoft Intune: create a PowerShell script that sets AllowDomainPINLogon to 1 under HKLM\SOFTWARE\Policies\Microsoft\Windows\System, and under HKLM\SOFTWARE\Policies\Microsoft\PassportForWork sets Enabled to 1 and DisableBiometrics to 0 (or 1 for PIN only). Upload the script under Devices → Windows → PowerShell scripts → Add, assign it to the right user or device groups, and let it run. Users can then configure PIN and biometrics in Sign-in options.